
Automating Spaceships with XState
After my unwieldy reducers and middleware failed to give me the confidence I needed to automate spaceships, I looked into XState as a replacement for Redux in my React application. In this post, I’ll describe my learning experience picking up XState.
Spacetraders API
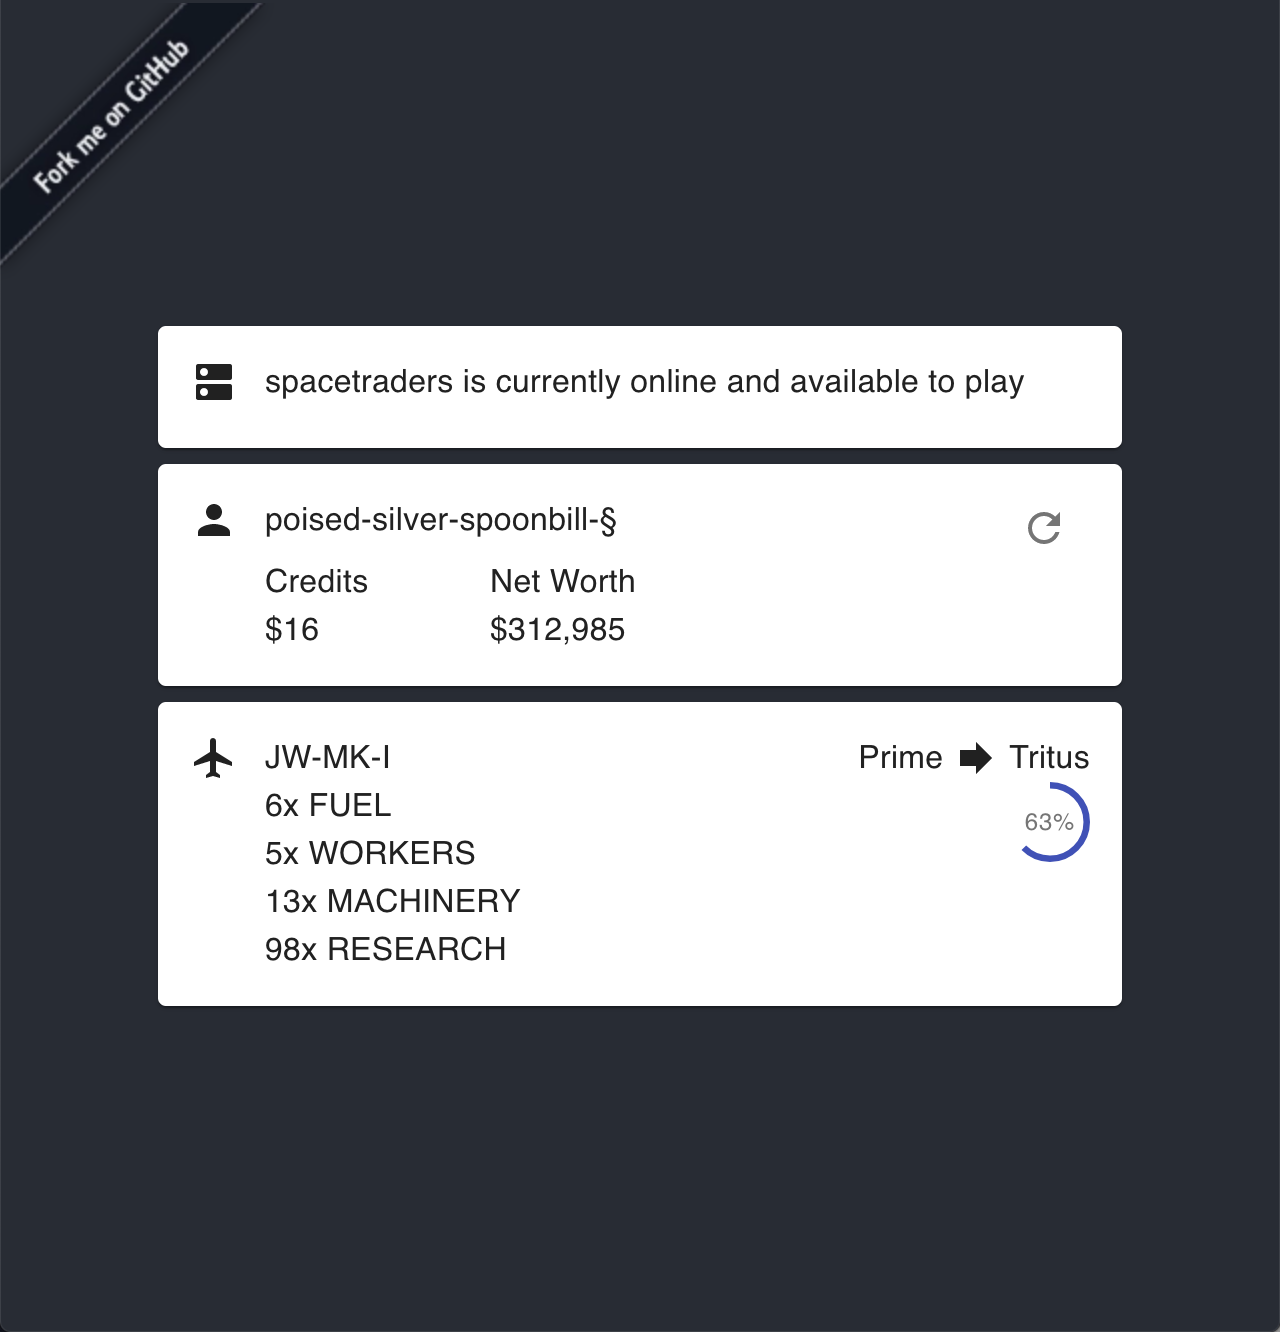
SpaceTraders API is a multiplayer space trading game built entirely on RESTful API endpoints. There’s no UI apart from those being built by other developers, and means the game is probably only interesting to programmers. However, I’m both a programmer and very interested in automating spaceships flying around inside this environment. For my first attempt I went went with what I know:
- React (create-react-app)
- Material-UI
- Redux (+ Redux Toolkit)
And I got as far automating the game through player registration, getting a loan and buying a ship. It was at this stage I realised I needed some way to transition between various states based on data received from the endpoints and my own implemented logic. My usage of middleware and reducers was ok at triggering actions off events, but it was becoming difficult to determine and control when to transition between states, especially when each state might have a collection of it’s own rules and flow within it. It sounded very much like I need some kind of state machine library, so I googled, and then dropped Redux and re-wrote my implementation in XState.
XState
XState is a library for creating, interpreting, and executing finite state machines and statecharts. The state machines you build in XState have the following five properties:
- A finite number of states
- A finite number of events
- An initial state
- A transition function that determines the next state given the current state and event
- A (possibly empty) set of final states
Importantly I can also break-down my desired state machines into smaller ones and link them to each other as needed. This lets me separate concerns across machines. For example, a playerMachine might register a player in the game and buy a ship. A shipMachine might then be used to control the actions of the purchased ship(s). XState also includes an online visualiser that lets you view the statechart created by your machine definition.
Implementing a State Machine
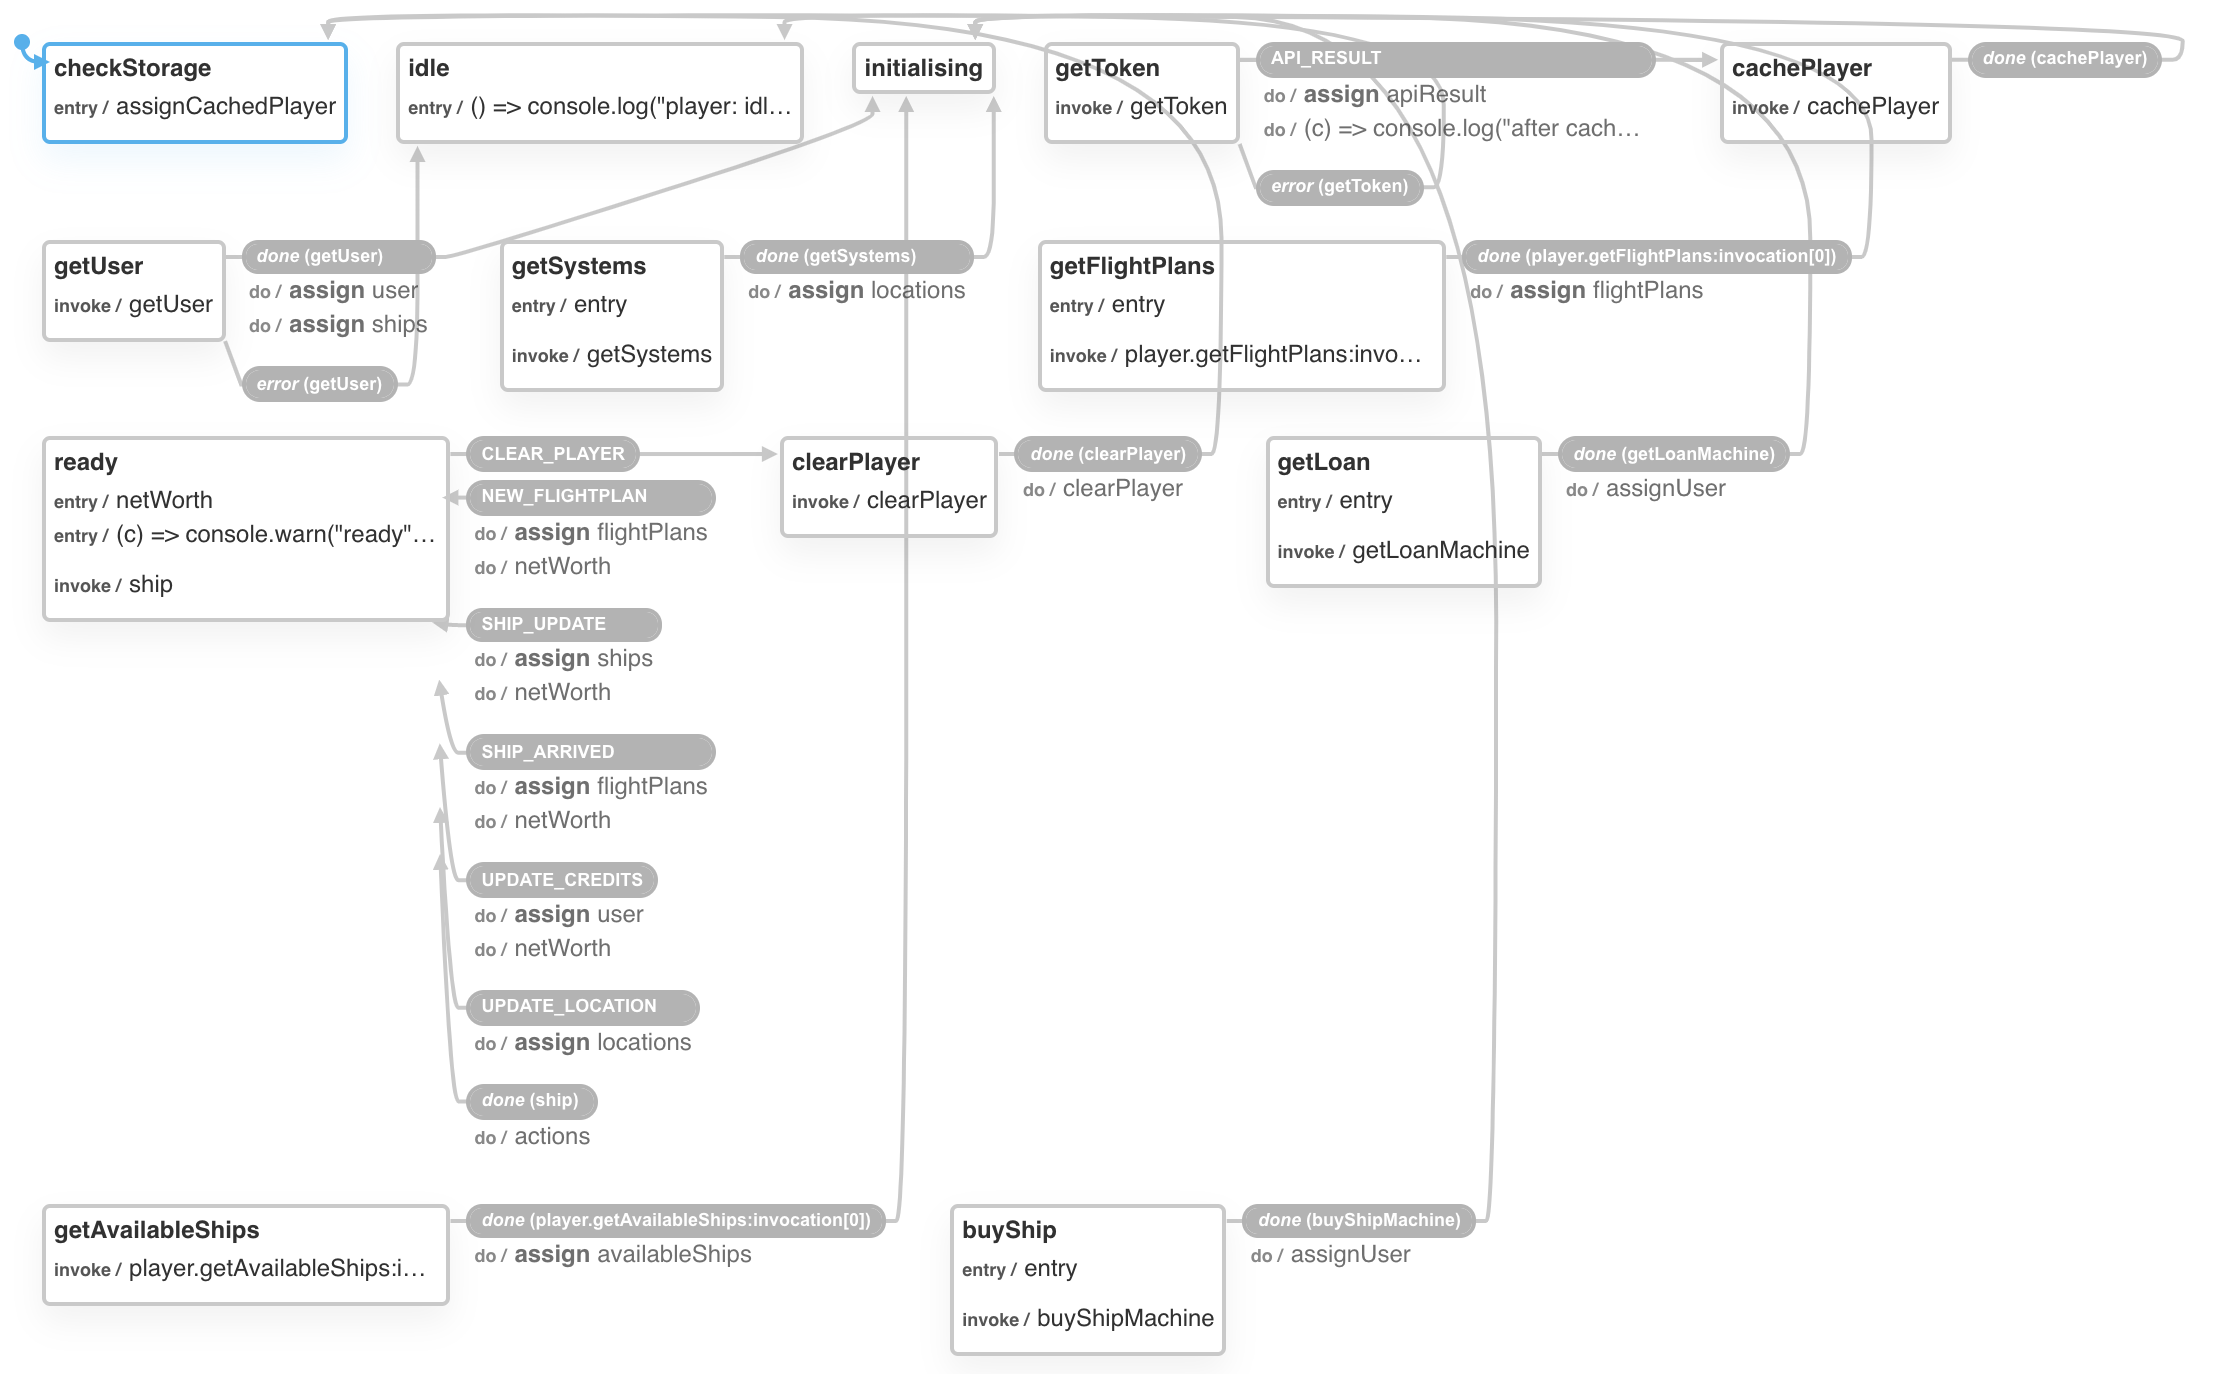
One of my state machines, getLoanMachine instructs the application to request a new loan. To perform this, I need to execute two requests:
- Get Available Loans and then;
- Request New Loan
These are both API calls that must occur one after another, and once a loan is successfully requested, the result should be passed back to the parent machine. The statechart looks like this:

And the JavaScript implementation that creates the above statechart is as follows. Note that you can copy the first parameter to Machine below and paste it into the visualiser and you’ll get the same statechart rendered as above.
Machine(
  {
    id: "getLoan",
    initial: "getAvailableLoans",
    context: {
      token: "",
      username: "",
      availableLoans: [],
      response: undefined,
    },
    states: {
      getAvailableLoans: {
        invoke: {
          src: "getAvailableLoans",
          onDone: {
            target: "requestNewLoan",
            actions: assign({
              availableLoans: (c, e) => e.data.loans,
            }),
          },
        },
      },
      requestNewLoan: {
        invoke: {
          src: "requestNewLoan",
          onDone: {
            target: "done",
            actions: assign({
              response: (c, e) => e.data,
            }),
          },
        },
      },
      done: {
        type: "final",
        data: {
          response: (context) => context.response,
        },
      },
    },
  },
  {
    services: {
      getAvailableLoans: (context) => api.getAvailableLoans(context.token),
      requestNewLoan: (context) =>
        api.requestNewLoan(
          context.token,
          context.username,
          context.availableLoans[0].type
        ),
    },
  }
);
This simple machine defines three states:
getAvailableLoansrequestNewLoandone
The first two invoke services defined in the second parameter to Machine above, and use onDone to assign the result to the machine’s context and target to transition to the next state. The last state’s type: final causes that state to end the machine and pass the context back to the caller.
XState Learning Curve
It took me a few evenings to ramp up on XState. The top three things that slowed me down are below, hopefully they can help you in your learning journey.
onTransition Doesn’t Fire For always
It’s possible to log transition changes by listening to servier.onTransition. As a newbie I added this early to understand when my machine was transitioning, however I also had a bunch of eventless transitions using a combination of always and cond. However, these types of transitions do not call onTransition as they are considered “microsteps”. I had no idea what microsteps were (and probably still don’t), but v5 of the library will make this easier.
I also needed to be able to listen to these transitions for the purposes of testing, so the work-around is to use Delayed Transitions instead with a 1ms delay - these do call onTranstion and otherwise work similarly to always.
assigning Context and Action Order
For me, it was not intuitive the way that Context is assigned and this is exacerbated by the order at which actions are executed. Work-arounds for troubles here generally meant adding extra properties to the Context and adding further states to assign bit by bit.
TypeScript Issues
There are known issues inferring Context with assign and bunch of these needed as any appended. The Visualiser only supports JavaScript, so additionally any types need to be stripped before you can view the statechart. It’s easy to prototype actions and services inline, but this also increases the usage of TypeScript-only syntax within the machine definition, meaning visualising can’t happen until you’ve refactored your inline code to machine options.
Including XState in React
The useMachine hook makes it very simple to include Machines in a React Application. However, from what I’ve understood so far, it doesn’t seem possible to view the state of a child machine, meaning any child state needs to be communicated to the parent via sendParent and assigned to its Context for useMachine to access it.
Here’s the application I wrote, and here’s the source.
Next Steps
Overall, and after the learning curve, my experience with XState has been pretty good. I definitely feel I’ve been able to both understand and automate states much better with XState than with Redux. Soon I intend to investigate XState’s Actor functionality to automate multiple ships via Actors instead of one ship via Service. Here’s a post on doing just that.